How to secure Jira and Confluence REST API calls in Data Center
Out-of-the-box authentication methods
- OAuth (available in Jira)
- Basic authentication
- Cookie-based authentication (available in Jira)
- Personal access token (since Jira v8.14, JSM v4.15, Confluence v7.9)
OAuth JIRA ONLY
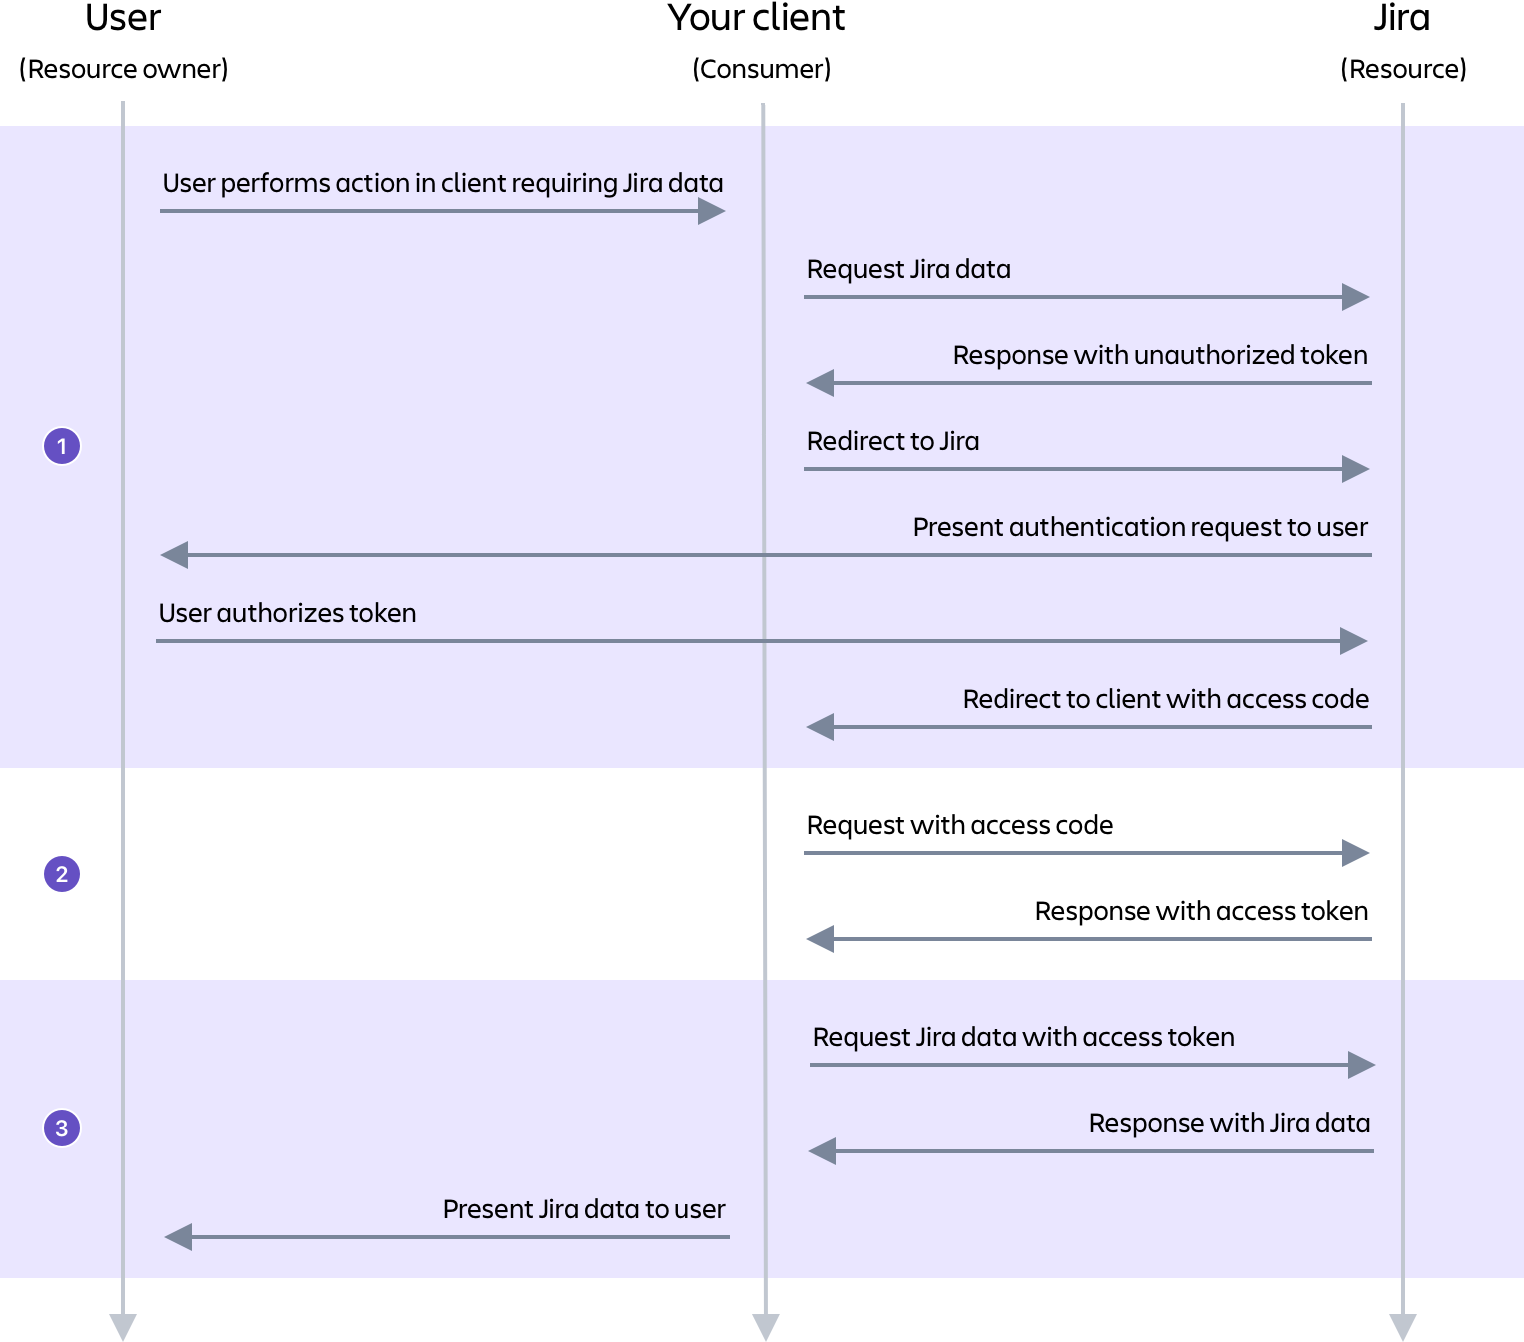
Get more info about the authorization flow here: OAuth
The tokens that are used with this OAuth method have nothing to do with personal access tokens. For more information about them, see the "Personal access token" section below.
See how to configure OAuth 1.0 to be used for the REST API calls: OAuth | Before you begin
Basic authentication
Authorization: Basic <credentials> header, where credentials are the username:password Base64 encoded.Security flaws
- Credentials are sent in a form that can be decoded easily (Base64). This could be solved by securing the connection using TLS/SSL.
- The password is sent repeatedly, for each request, which opens up a larger attack window.
- The password is cached by the browser, so it can be silently reused by any other request to the server.
- The password may be stored permanently in the browser, if the user requests. This creates a similar risk as the previous point, and also may allow it to be stolen by another user on a shared machine.
-
Get more info about basic authentication and Jira REST API: Basic authentication
-
Learn how this can affect the REST API calls: CAPTCHA
Disabling basic authentication in Jira
- Learn how: Disabling basic authentication
Cookie-based authentication JIRA ONLY
- The client creates a new session for the user via the Jira REST API (calling the session resource
/auth/1/sessionwith a username and password). - Jira returns a session object that has information about the session, including the session cookie. The client stores this session object.
- The client can now set the cookie in the header for all subsequent requests to the Jira REST API (
Set-Cookie: JSESSIONID=6E3487971234567896704A9EB4AE501F; Path=/; HttpOnly).
-
Get more info about cookie-based Authentication and Jira REST API: Cookie-based authentication
-
Learn how this method is affected by cookie expiration, CAPTCHAs, and form token checking: Advanced topic
Personal access tokens
How personal access tokens work
- A user can create or revoke their own personal tokens via the User Profile screen.
- For Bitbucket and Bamboo, tokens are only for REST API calls and can't be used for product UI login. In contrast, for Jira and Confluence, tokens serve both for REST API calls and product UI login.
- The individual tokens will inherit the user’s existing product permissions.
- Tokens can be expiring (specified in days) or non-expiring. The ability to create non-expiring tokens can be switched-off with the
atlassian.pats.eternal.tokens.enabledsystem property (trueby default). - The user can create a maximum of 10 tokens — this can be adjusted with the
atlassian.pats.max.tokens.per.usersystem property. - To see other system properties that can be configured, see the "System properties" table below.
- Once generated, the token given to the user cannot be retrieved, it needs to be remembered.
- Tokens are immutable, i.e. they can’t be changed after they have been created.
- When a users successfully authenticates to the REST API using a created token, the “Last authenticated” timestamp is updated in the token list.
- Admins can administer user tokens, including viewing, searching, and deleting.
- To invoke a REST API call using the token, an HTTP Bearer authorization header has to be included:
1curl --header 'Authorization: Bearer NDcwNDQ0NTQ2MzE5Ol7lyYmNQ8WynnNMlhW2MpewDjGr' http://localhost:2990/jira/rest/api/2/project- A token itself can be created through the REST API:
1curl --request POST 'http://localhost:2990/jira/rest/pat/1.0/tokens' \2--header 'Authorization: Bearer NDcwNDQ0NTQ2MzE5Ol7lyYmNQ8WynnNMlhW2MpewDjGr'3--header 'Content-Type: application/json' \4--data-raw '{5 "name": "Yet Another Token!",6 "expirationDuration": "90"7}'How the token is built and managed internally
- The token is made up of two parts, the ID and the secret.
- The ID is a 12 digit number that represents the username.
- The secret is 20 bits of random data.
- The ID, a ":" character, and the secret are concatenated, then base64 encoded. This token is returned to the user.
- The secret is put through our default password encoder and is stored hashed and salted in the database along with the plain text ID number.
System properties
Property | Default | Description |
|---|---|---|
atlassian.pats.enabled | true | Whether personal access tokens are globally enabled |
atlassian.pats.eternal.tokens.enabled | true | If users should be able to create tokens that do not expire |
atlassian.pats.mail.notifications.enabled | true | Whether mail notifications are globally enabled |
atlassian.pats.last.used.update.interval.mins | 1 | The interval at which the scheduler job is updating the 'last accessed at' property of each token, in minutes |
atlassian.pats.pruning.schedule.cron | 0 0 0 * * ? - 12 am local time, every day | The CRON expression for the expired token pruning scheduler job |
atlassian.pats.pruning.delay.days | 30 | The delay before expired tokens are removed from the database, in days |
atlassian.pats.max.tokens.expiry.days | 365 | Maximum number of days for a token to expire |
atlassian.pats.max.tokens.per.user | 10 | Maximum number of tokens allowed per user |
atlassian.pats.auth.cache.expiry.mins | 60 | The length of time, in minutes, an item can stay in the authentication cache before being removed |
atlassian.pats.auth.cache.max.items | 5000 | The maximum number of items allowed in the authentication cache |
atlassian.pats.expiry.check.schedule.cron | 0 0 * * * ? - every hour | The CRON expression for the scheduler job that sends notifications about expired tokens and tokens that will expire soon |
atlassian.pats.expiry.warning.days | 5 | How many days before sending an e-mail notification about tokens that will expire soon |
atlassian.pats.invalidate.session.enabled | true | If the session should be invalidated after succeeded authentication using personal access token |
atlassian.pats.token.name.length | 40 | The maximum number characters to be used for token name |
Note: You have to set these properties on every node of your Data Center instance.
How to add more security to the REST API calls
Rate limiting
Anonymous traffic is represented by one user called “Anonymous”. This “user” aggregates all anonymous traffic into one bucket for all sources of anonymous requests.
- Set a default per-user limit
- Set per-user exemptions (limits different than the default, whether more restrictive or less restrictive)
- Set an exemption for the aggregated anonymous traffic
- See who is being limited across all nodes in the cluster
How rate limiting and personal access tokens work together
Rate limiting kicks in after authentication, so the per-user limits and exemptions also apply when using personal access tokens.
What rate limiting is based on
- A token is needed to make HTTP REST requests.
- Each request costs one token.
- Users get new tokens at a constant rate so they can keep making new requests. This represents the number of requests they are allowed, and can be, for example, ten every one minute.
- Tokens are added to a user’s personal bucket until it’s full. This is their max number of requests, and they can adjust the usage of tokens to their own frequency, for example twenty every two minutes instead of ten every one minute, as specified in their usual rate.
- If the bucket becomes empty, HTTP REST requests will not be processed and a 429 error code will be returned.
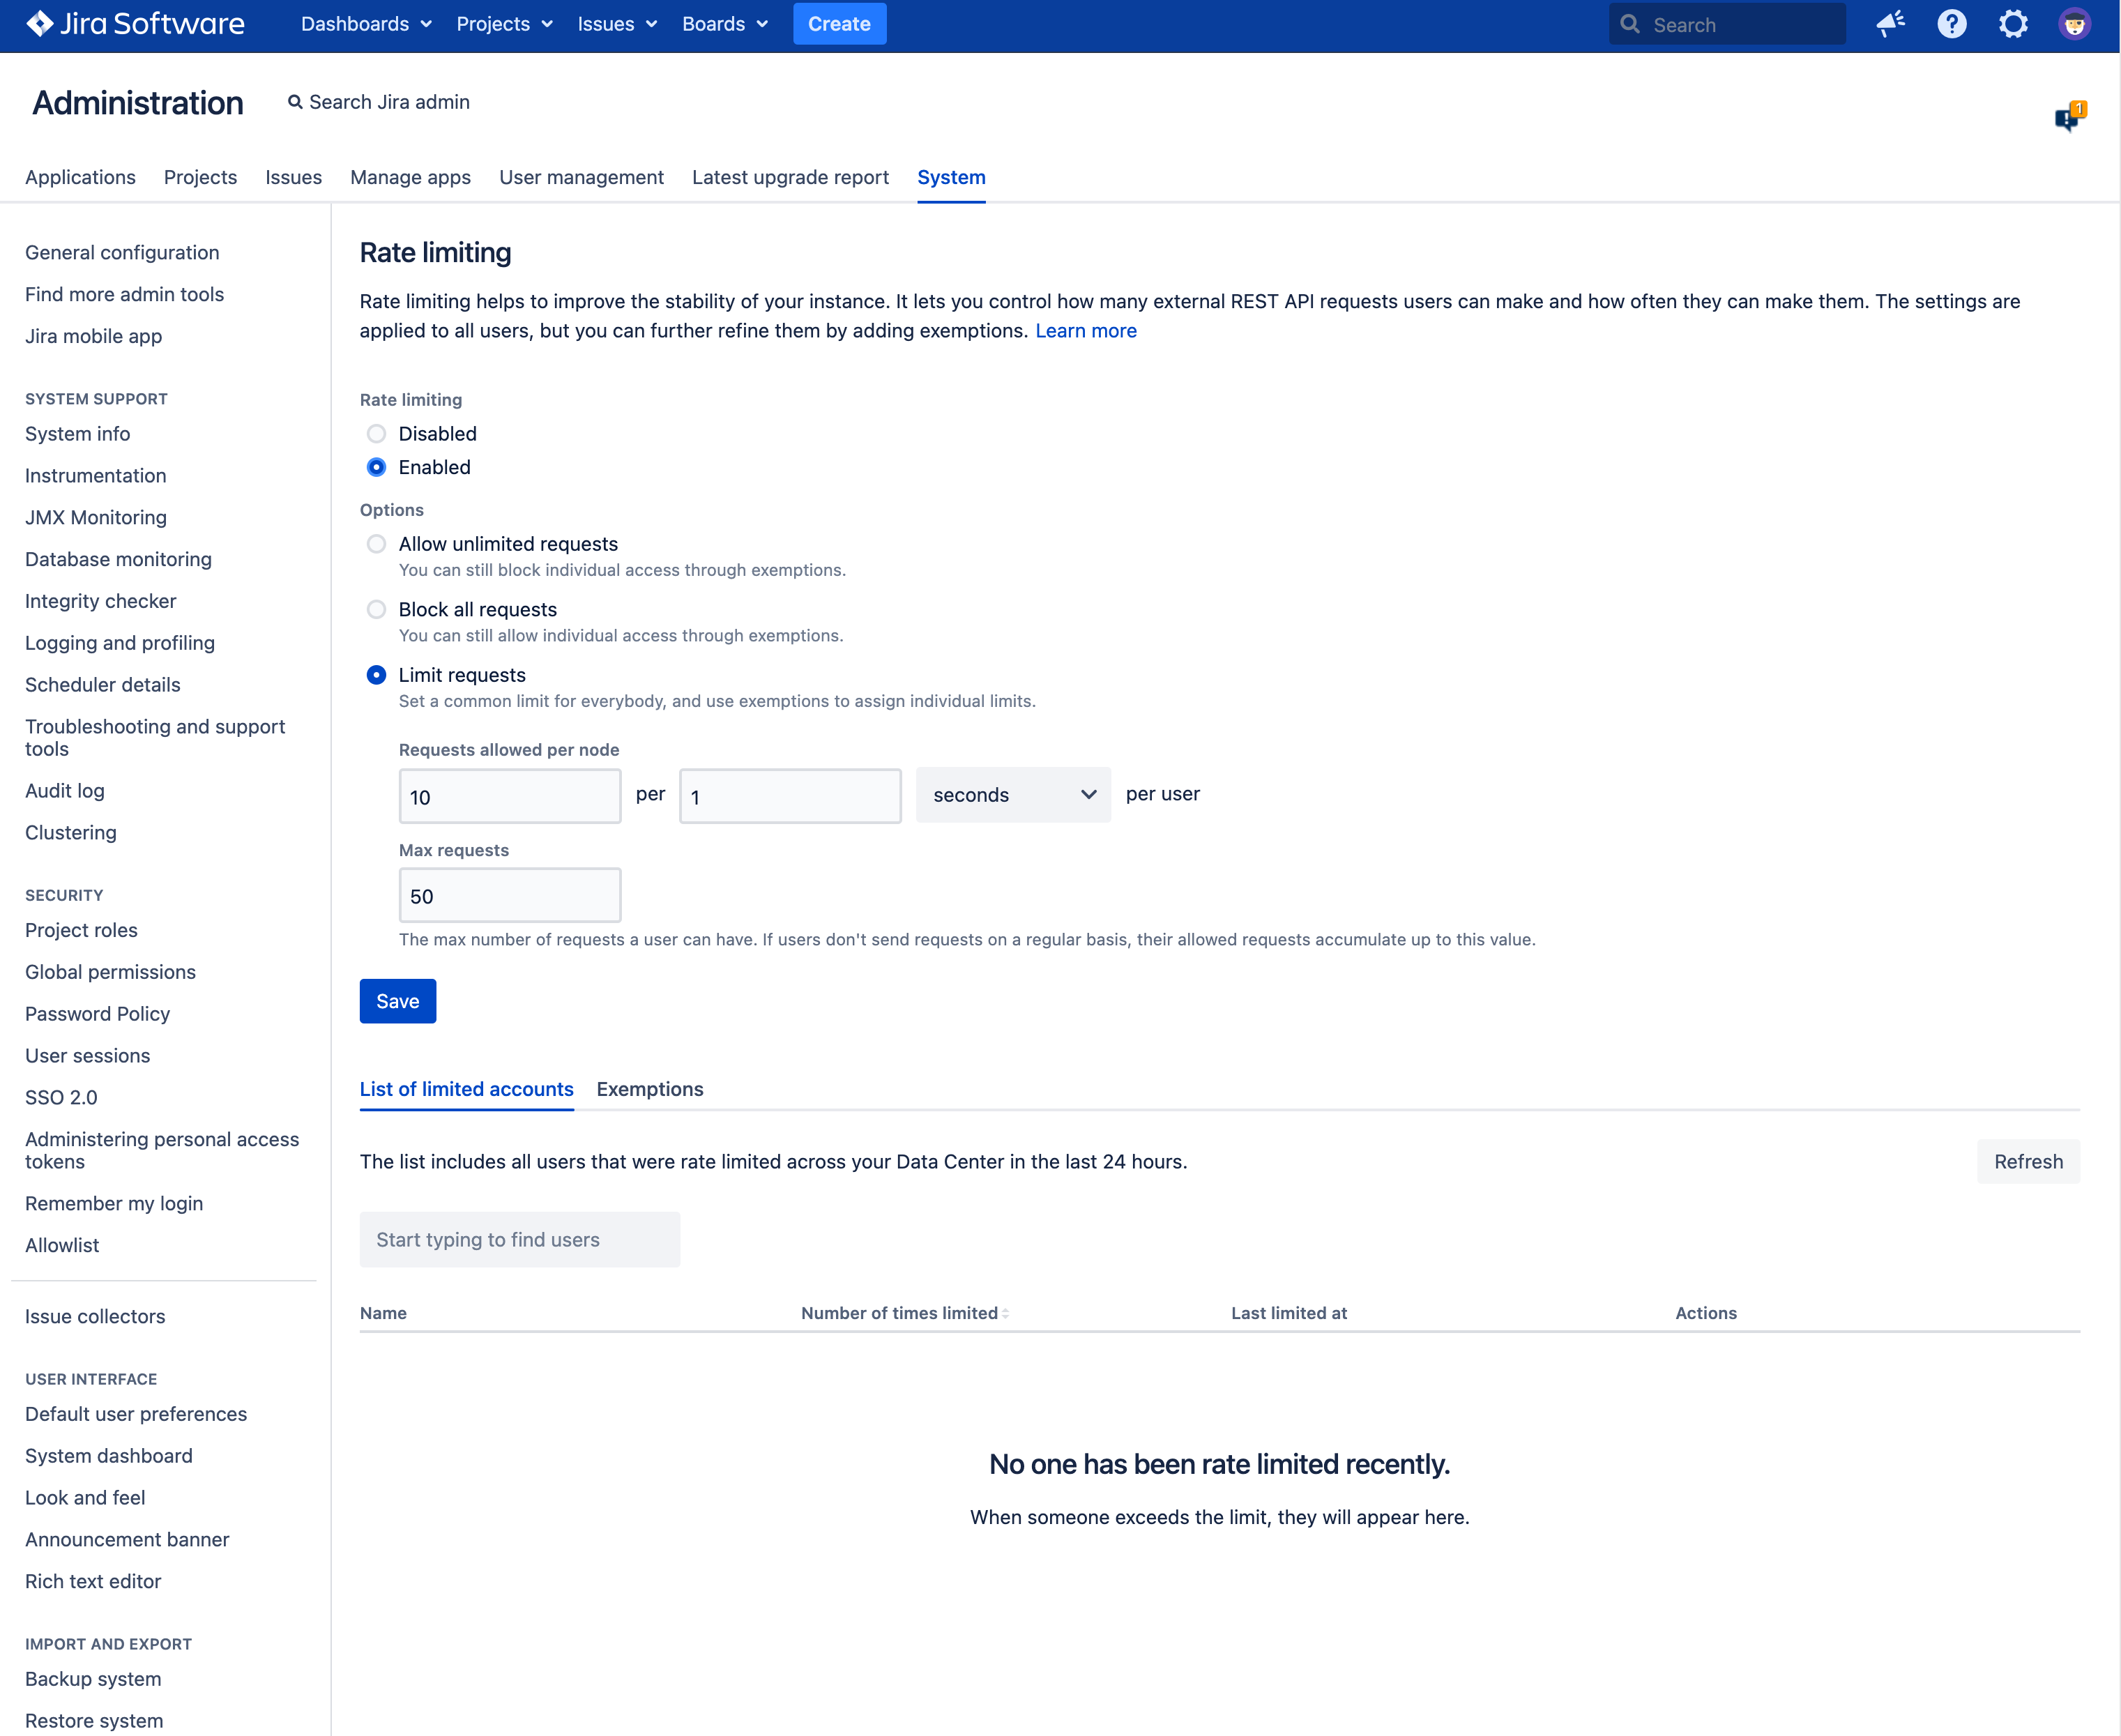
Getting started
- By default, all configurations are set to disabled.
- Admins have the choice of three options:
- Allow unlimited requests (can still block individual access through exemptions)
- Block all requests (can still allow individual access through exemptions)
- Limit requests (set a common limit for everybody, and use exemptions to assign individual limits)
- Exemptions allow you to customize rules for unique users.
- Exemptions can be created when rate limiting is disabled. The features will not work until rate limiting is enabled.
- It is possible to add multiple users to an exemption.
- Beyond this new rate-limiting algorithm and rule set, the API endpoints and the way you engage the API remains the same.
Turning rate limiting off
Impact to users that are rate limited
Header | Description |
|---|---|
X-RateLimit-Limit | The bucket size (capacity) |
X-RateLimit-Remaining | The remaining number of tokens. This is what you have and can use right now. |
X-RateLimit-Interval-Seconds | The time interval in seconds. You get a batch of new tokens every such time interval. |
X-RateLimit-FillRate | How many tokens are added to the bucket on each refill. Sys admins configure this as Requests allowed. |
retry-after | How long you need to wait until you get new tokens. This value is 0 when the bucket is not empty. If the bucket is empty, this value is likely to not be zero. |
Benefits of "self-protection" capabilities
- Visibility: gives you the ability to see who is being rate limited, how many times requests are being limited, and when a user was last limited
- Security and control: admins are able to set custom configurations and add users to an allow-list, bypassing all restrictions
- Stability and performance: rate limiting helps to regulate CPU volume
Related info
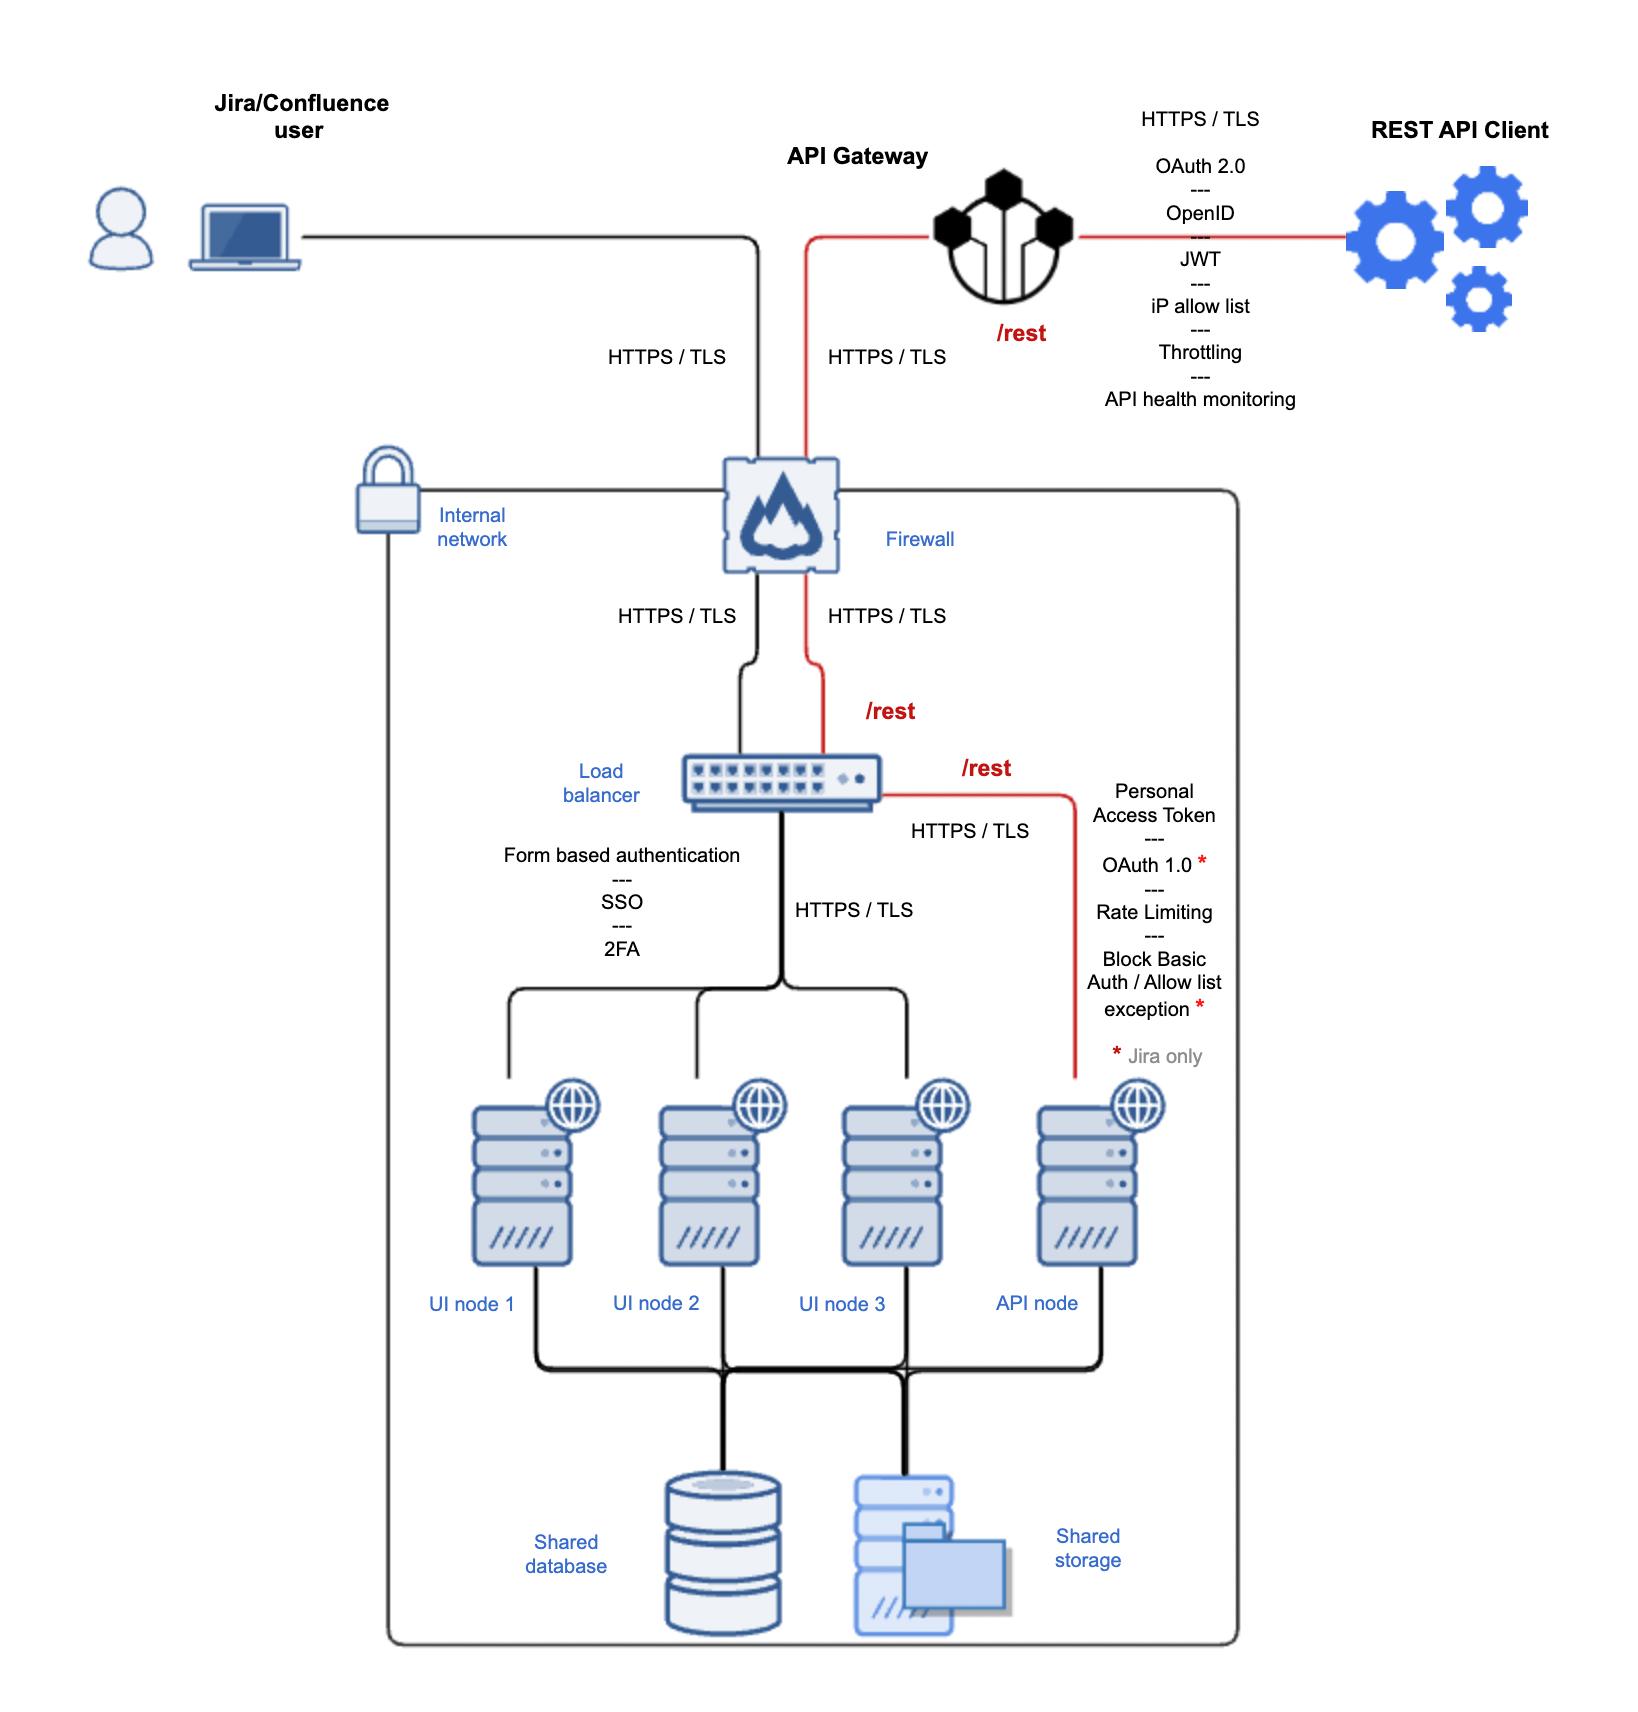
API gateway/proxy
- Tracking of API calls: who is invoking the APIs, when, how much, etc.
- Authentication/authorization: API gateways enable admins to add an additional security layer and provide support for methods that are not yet supported natively by the Atlassian Data Center products (e.g. OAuth 2.0)
- Filtering of API calls: API gateways can provide additional filtering capabilities to those provided out-of-the-box by the Atlassian Data Center products
- API management: API gateways can be part of the corporate API management
Sample architecture with an API gateway protecting a dedicated API node for Jira/Confluence
Marketplace apps
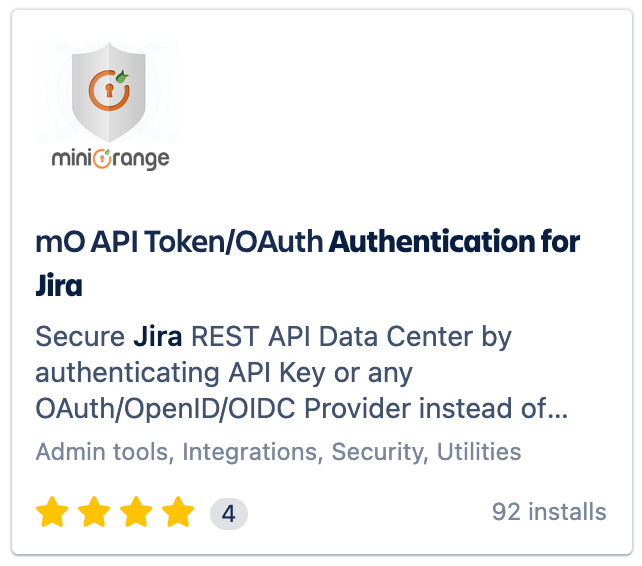
- Allows you to disable Jira's basic authentication or OAuth 1.0 authentication
- Supports creating or revoking individual API tokens for users and universal API tokens for services
- One-click enable or disable REST API authentication using OAuth 2.0
- Allows you to create or revoke API tokens to better secure and manage your data using REST API calls
- Secures all the Confluence APIs
- Coming soon: IP restriction and cookie-based authentication
Was this content helpful?
Connect, share, or get additional help
Atlassian Community