How to assign Weighted Shortest Job First (WSJF) to work items
Background
- Business Value (BV): relative value to the business or the end-user.
- Time Criticality (TC): impact of delay in delivering value to the end-user.
- Risk Reduction (RR) / opportunity enablement: enables new business opportunities or reduces the potential risks for present or near-future considerations.
- Job Duration (JD): relative approximation of time based on an initial rough estimation of the work.
- Job Size: can be used as a proxy for JD. This is a relative estimation of how large the expected effort will be.
BV | TC | RR | JD | WSJF | |
|---|---|---|---|---|---|
Feature A | 5 | 10 | 10 | 5 | (25/5) = 5 |
Feature B | 10 | 5 | 5 | 5 | (20/5) = 4 |
Description
You will need Jira software administrator permission to create the five custom fields listed below. Refer to Atlassian product documentation for information about how to create custom fields and add them to the appropriate screens.
- Business Value
- Time Criticality
- Risk Reduction
- Job Duration or Job Size
- WSJF
You will need Jira software administrator permission to create global automation rules.
Create and edit Jira automation rules | Cloud automation | Atlassian Support
- Create a WSJF calculation rule in the global automation section under the admin system settings.
- Navigate to the rules page by selecting settings in the upper right corner.
- Select system.
- In the left navigation pane under the automation section, select global automation.
- Select create a rule on the top right.
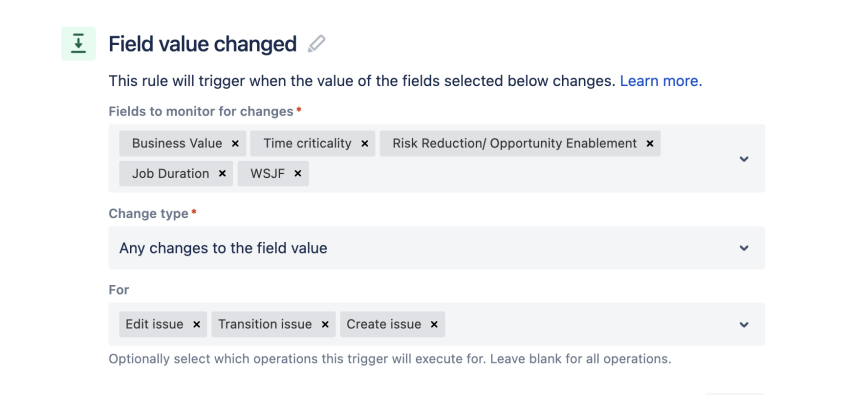
- Define the trigger.
- Select field value changed and add all the custom fields for WSJF.
- Make the selections and verify everything matches the screenshot below.
- Select save.
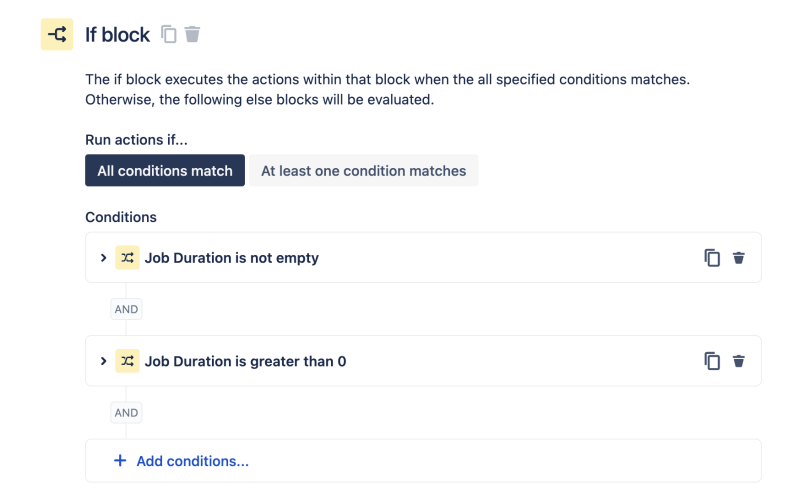
- Select all conditions match.
- Select + add conditions.
- Select issue fields condition.
- In the issue fields condition, for field, select Job Duration or Job Size.
- For condition, select is not empty.
- Select + add conditions, select issue fields condition.
- For field select Job Duration or Job Size.
- For condition select greater than a value of 0.
- Select save.
- Select new action.
- Select edit issue (The action of WSJF calculation should be performed on the edit issue when the above if condition is verified).
- Search for and select the WSJF field to set. (We will be using Jira smart values math expressions to perform the calculations and update the WSJF number field.)
- In the WSJF text field, copy and paste the expression below. *Remember to replace the customfield_ids with the correct entries for BV + TC + RR / JD (or Job Size) for your Jira instance.
{{#=}}({{Issue.fields.customfield_13034|0}} + {{Issue.fields.customfield_10019|0}} + {{Issue.fields.customfield_13035|0}})/{{Issue.fields.customfield_13036|0}}{{/}} - Select save.
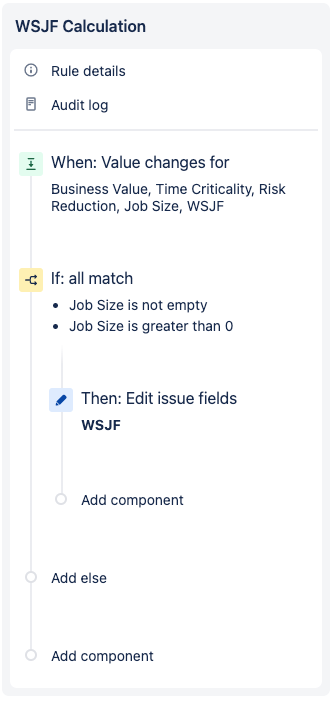
- Select add else to the left or the WSJF Automation box. (We add this statement to make sure that the WSJF score is valid.)
- Leave the default value for the run actions if … selection as all conditions match.
- Select save.
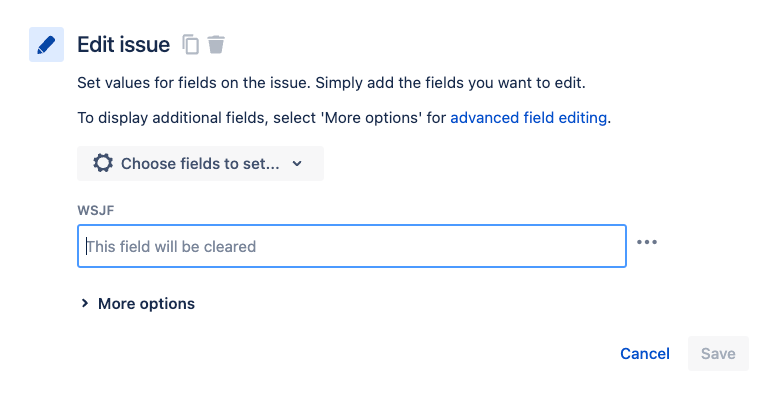
- In the add component section, select new action.
- Select edit issue and select field WSJF. Leave the default at this field will be cleared.
- Select save

- Select plan settings.
- Select custom fields to include all the WSJF custom fields.
- Select save and go back to plan.
- You can also follow these instructions: Add and view custom fields in Advanced Roadmaps
- Update the view with the WSJF fields and show them as columns.
- Create a new view and name it WSJF
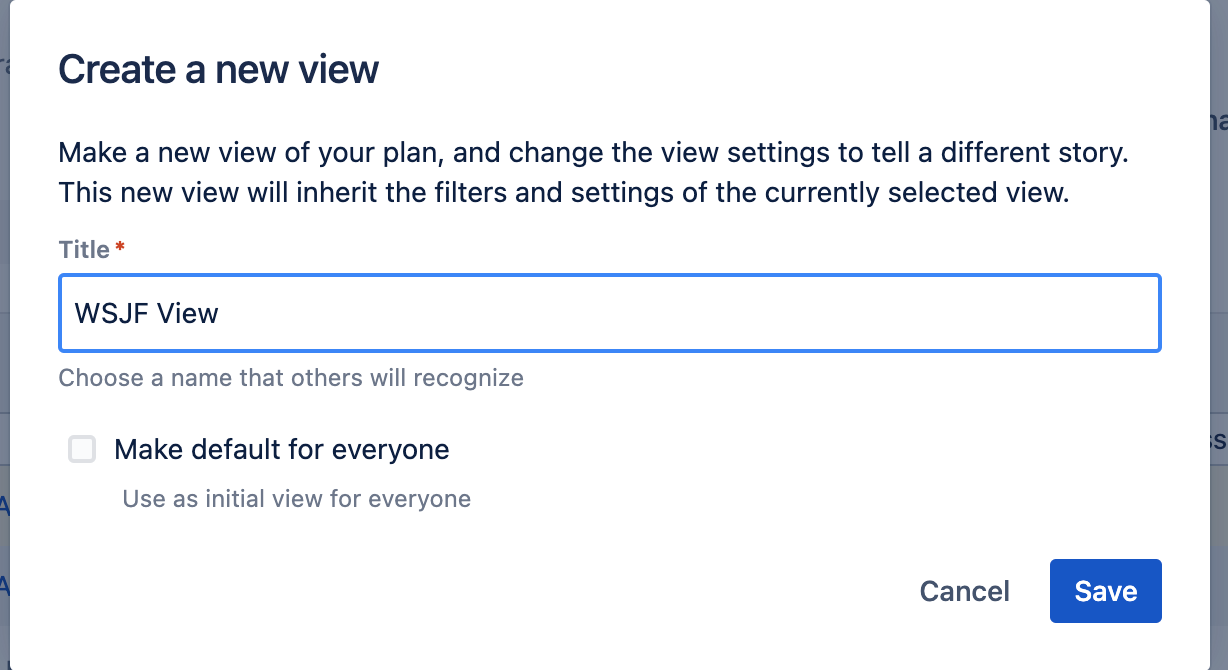
- Below is an example of how your plan could look with all the visible WSJF fields. We recommend using WSJF for epics/features or investment-level work objects.
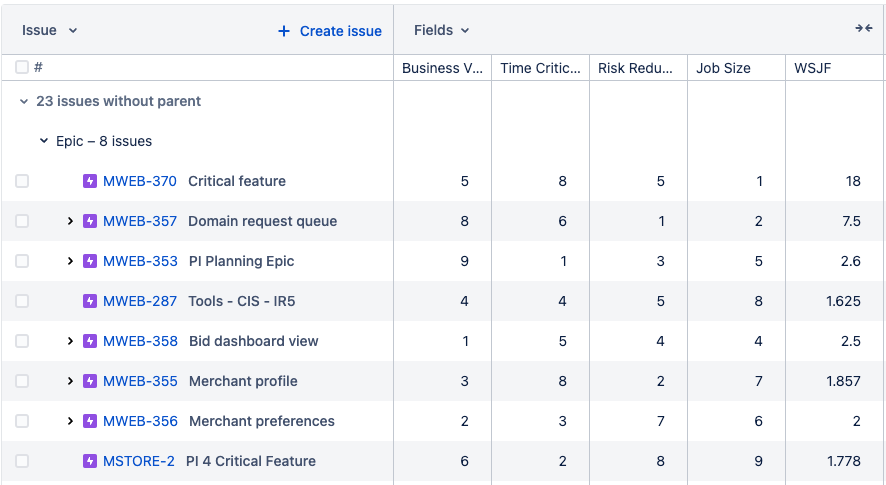
We recommend facilitating the capture of BV, TC, RR, and JD across all the selected backlog items, then saving all the changes simultaneously to Jira by selecting review changes. Then refresh your plan to render the WSJF values.
- Select view settings and select sort by rank.
- Drag and drop the work items in priority order.
- Select review changes and update the new ranking to Jira.
Output
- New custom fields to collect Business Value, Time Criticality, Risk Reduction, Job Duration or Job Size, and WSJF on Jira epics.
- New global automation rule to calculate WSJF.
- Guidance on how to display and prioritize Jira backlog items using WSJF.
References
- WSJF — Scaled Agile Framework (SAFe guidance)
Next step:
How to create a risk board in JiraWas this content helpful?
Connect, share, or get additional help
Atlassian Community